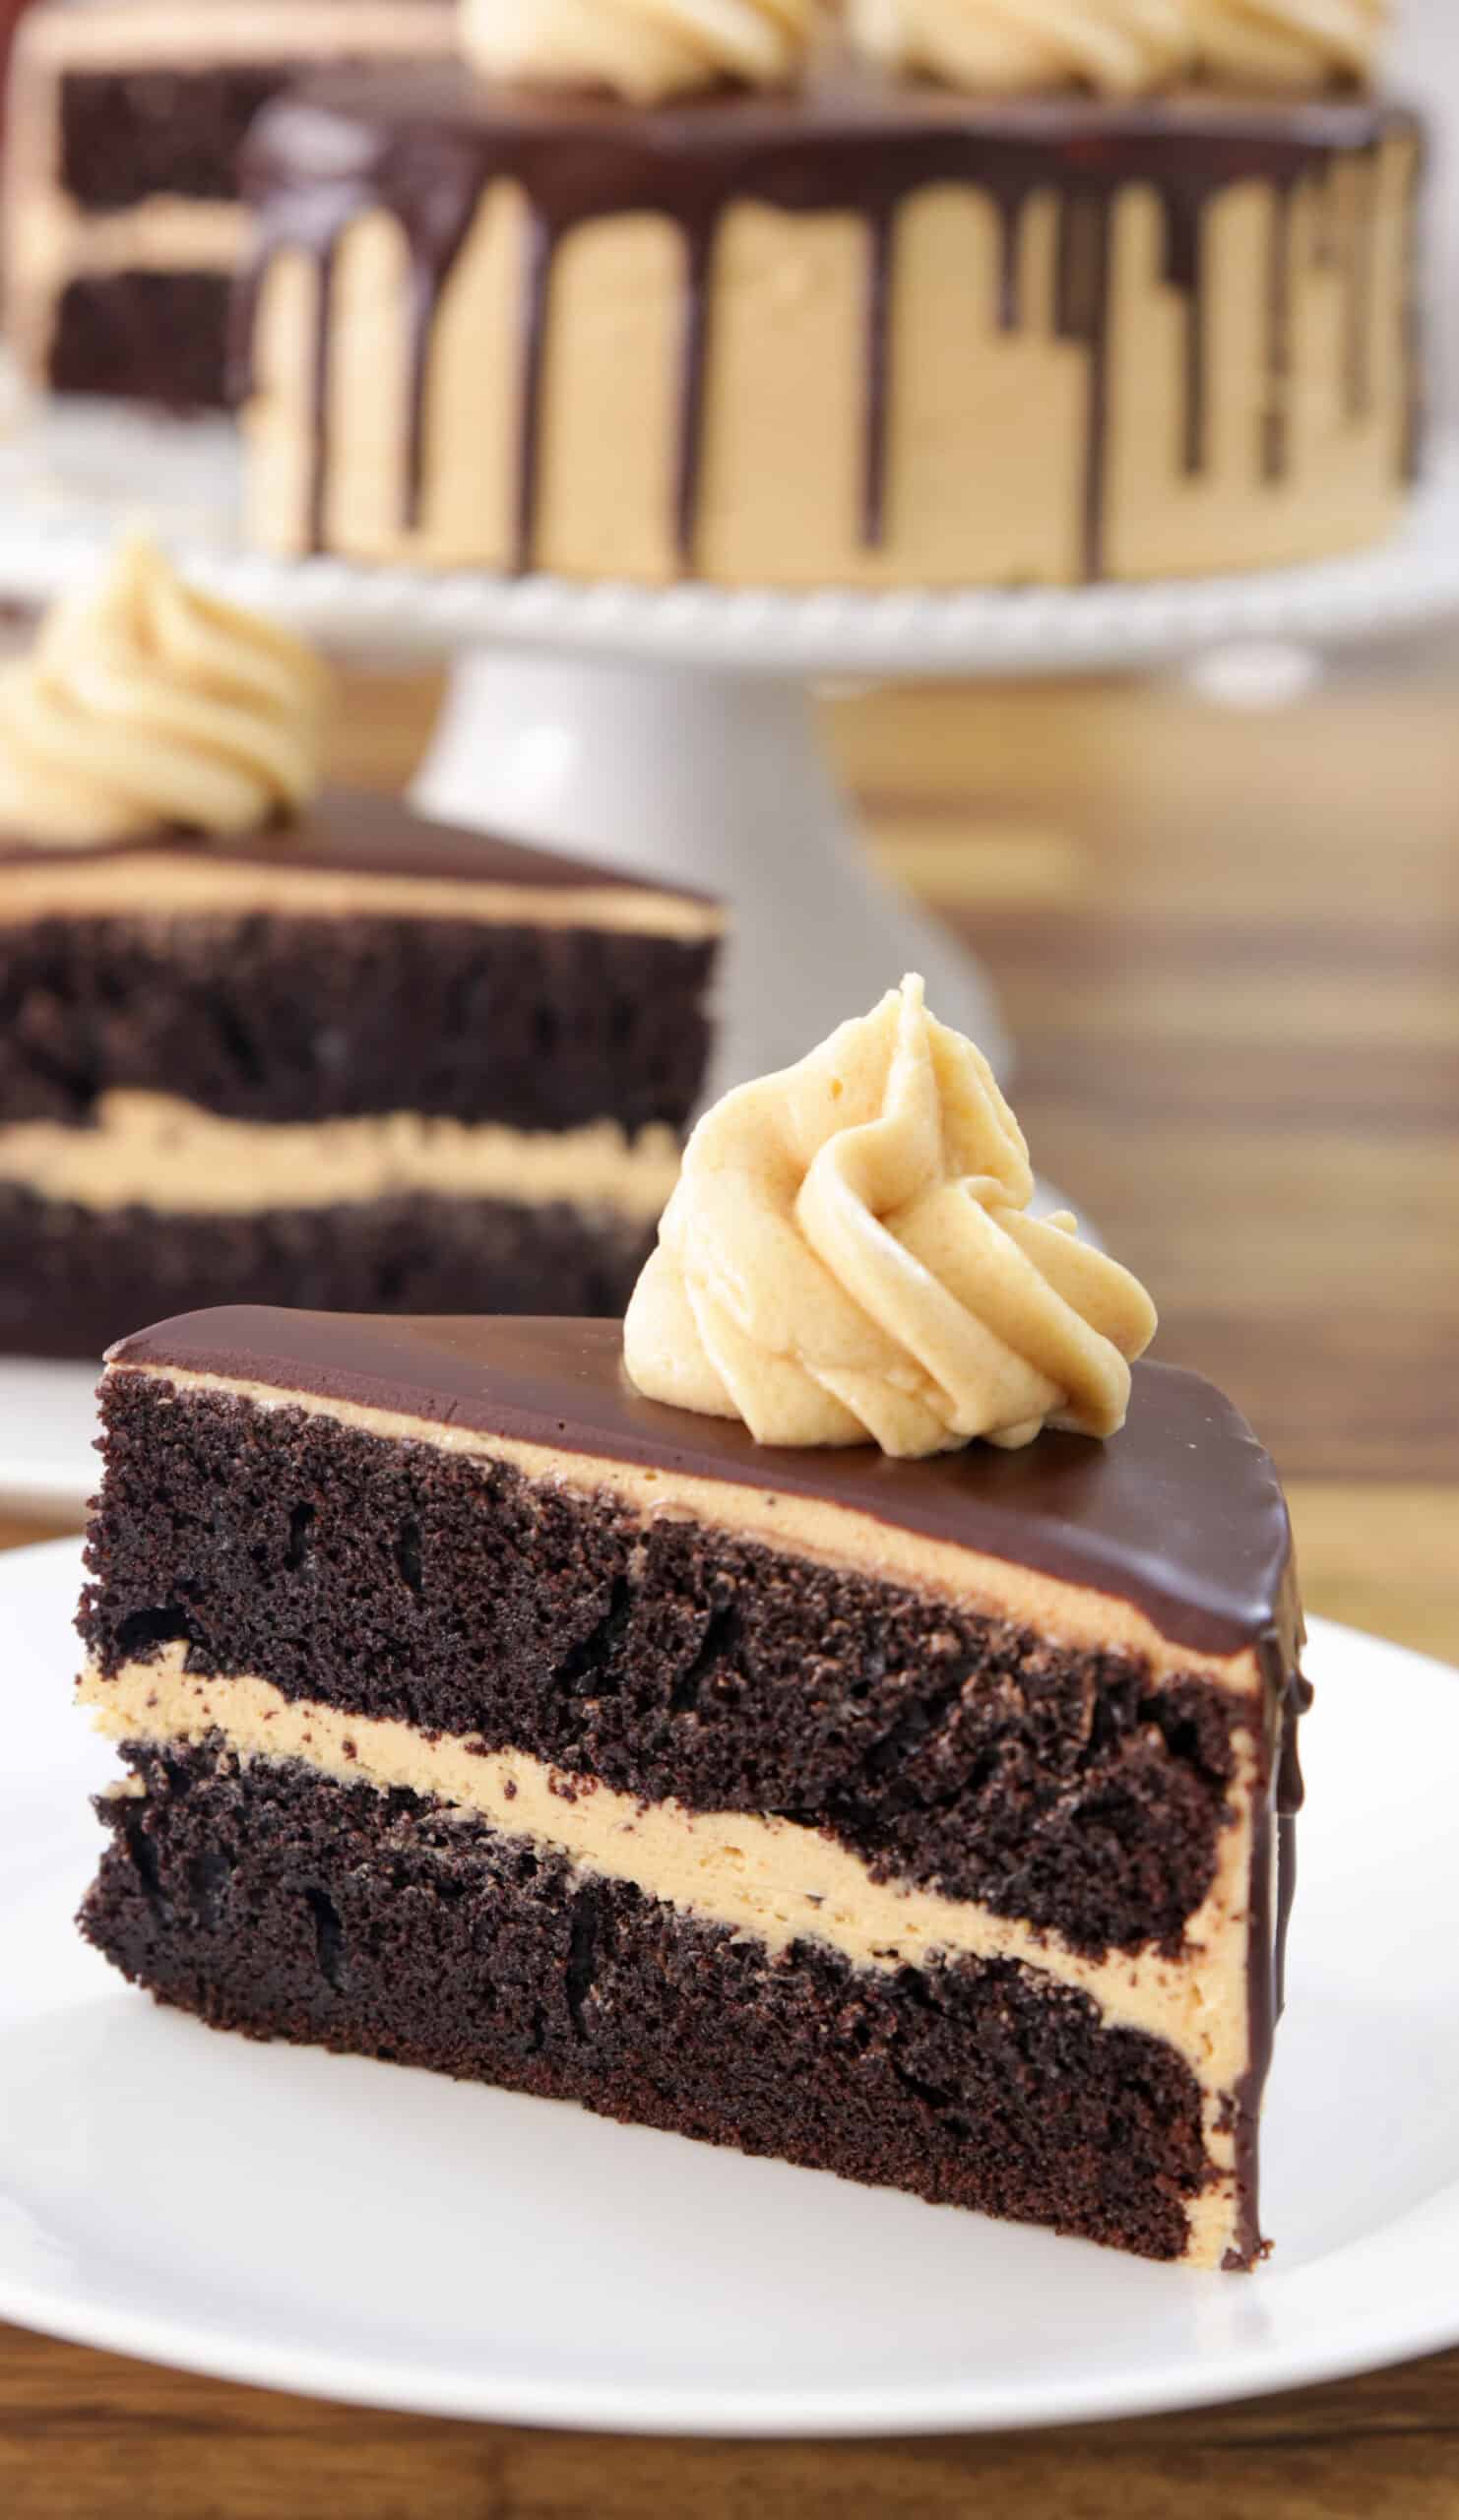
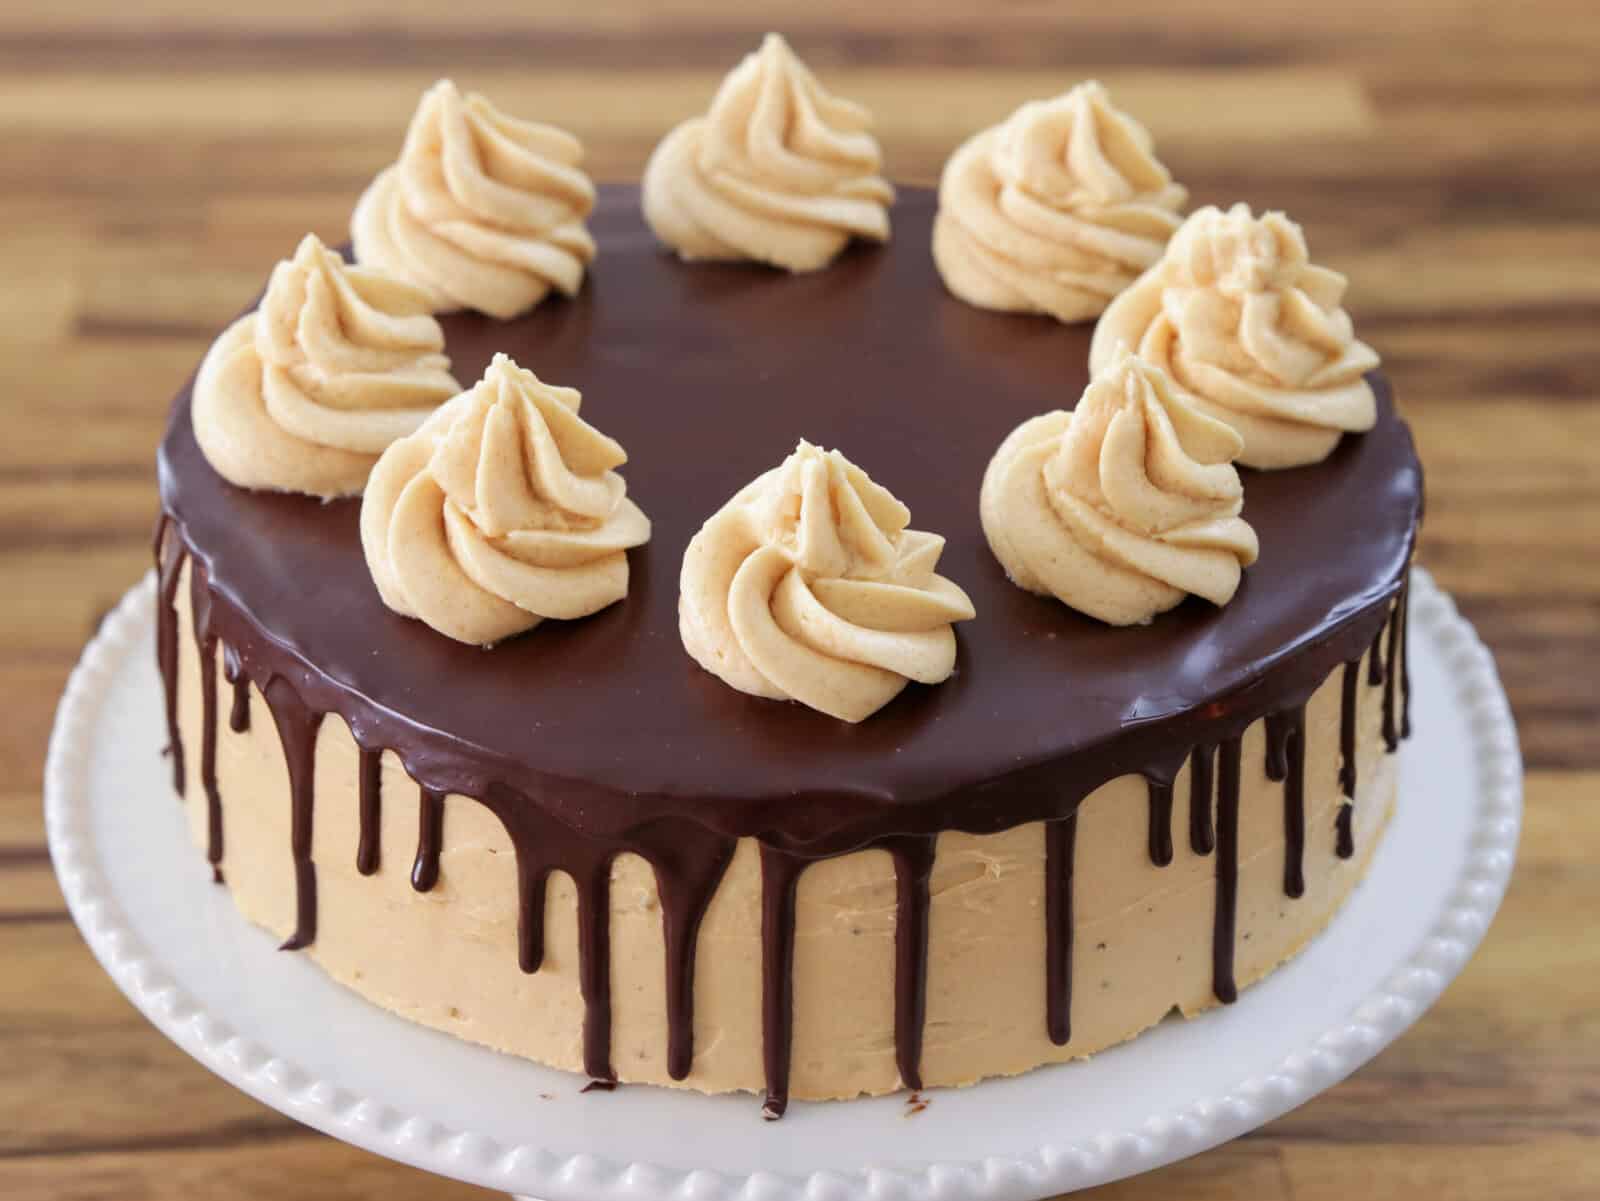
Salty-sweet, fluffy, fudgy perfection awaits with my decadent Chocolate Peanut Butter Cake recipe. Between two towering layers of moist chocolate cake with peanut butter frosting and chocolate ganache, this show-stopping celebratory centerpiece is sure to satisfy any sweet tooth.
I originally published this recipe in 2021 and have since added new photos and a few more success tips.
What happens when you combine the best chocolate cake recipe with the nutty goodness of homemade peanut butter and chewy chocolate ganache? A chocolate peanut butter cake that’s practically guaranteed to knock your socks off! Considering my YouTube recipe has garnered over 162,000 views and 3,900 likes, it’s clear that fans of Reese’s peanut butter cups are in for a real treat.
Ingredients & Substitutions
Best Chocolate CakeLayers – My simple, foolproof recipe is made with just 10 basic ingredients. The full list and amounts are in the recipe card below.
Butter& Natural Peanut Butter – This dynamic duo makes for a fantastic buttercream frosting base. If possible, opt for European-style butter which has a higher fat content than conventional.
Vanilla Extract – Feel free to use an equal amount of vanilla paste if needed.
Powdered Sugar – Also aptly known as “icing sugar,” this fluffy white sweetener ensures a perfectly smooth, pipable frosting. If you don’t have any on hand, blitz white sugar and cornstarch in a food processor using a 1 cup to 1 tablespoon ratio.
Heavy Cream – Just a little bit of cream helps thin out the peanut butter buttercream enough to make it fluffy and cloud-like, and melts with the chocolate to make a silky ganache. If needed, you can use slightly lighter whipping cream.
Dark Chocolate – The higher the percentage of cocoa, the richer and darker your ganache will taste. I personally prefer around 70%, but feel free to use lighter or darker according to your preferences.
This is just a short review of the ingredients; for the complete recipe, including quantities, scroll down to the recipe card 👇
Natural Peanut Butter vs. No-Stir Peanut Butter
When it comes to peanut butter frosting, the type you choose matters more than you might think. Natural peanut butter, made from just peanuts (and sometimes salt), is what gives this frosting its rich peanut flavor. Because natural peanut butter contains only its own peanut oils, it creates a smooth, luscious frosting that tastes like real peanuts rather than candy.
No-stir peanut butter, on the other hand, contains added stabilizers like palm oil and sugar to keep it creamy and shelf-stable. While it’s great for fluffernutter sandwiches and other recipes, it can make this frosting overly sweet, overly thick, or even greasy. It also has a slightly more processed flavor, which can get lost against rich chocolate cake and ganache.
For this recipe, natural peanut butter is key. It melts seamlessly into the buttercream, delivers bold peanut flavor, and helps create a fluffy, silky texture that pairs beautifully with the chocolate cake layers. If your natural peanut butter has separated, just stir it very well before measuring to ensure your frosting comes out perfectly smooth.
How to Make Chocolate Peanut Butter Cake
Watch the full video recipe to learn how to make the BEST Chocolate Cake with Peanut Butter Frosting. This step-by-step tutorial simplifies the process, offering tips and tricks to guarantee perfect results every time.
Prefer the written recipe? Scroll down to the recipe box 👇
Don’t skip the buttermilk!
Optional Variations & Dietary Adaptations
Dairy-Free – Use a high-quality plant-based butter in the frosting, and replace the buttermilk with unsweetened soy milk mixed with 1 tablespoon lemon juice. For the ganache, use dairy-free chocolate and full-fat coconut milk in place of heavy cream.
Nut-Free – Instead of peanut butter frosting, make a SunButter frosting using sunflower seed butter. It creates a similar creamy texture and works beautifully with chocolate. Just note it may turn slightly green if exposed to baking soda, so use it in baked recipes with caution.
Peanut Butter Cup Cake – Sprinkle chopped peanut butter cups between the cake layers for extra texture and richness. You can also press mini peanut butter cups around the outside of the cake for decoration.
Salted Peanut Crunch – Add a handful of chopped roasted peanuts or honey-roasted peanuts between the layers for texture. Feel free to add a drizzle of salted caramel sauce, too. A light sprinkle of flaky sea salt on top of the ganache also boosts the sweet-salty contrast.
Chocolate Chip Crunch – Stir in mini chocolate chips to give the frosting a little bite, perfect for anyone who loves texture in their frosting.
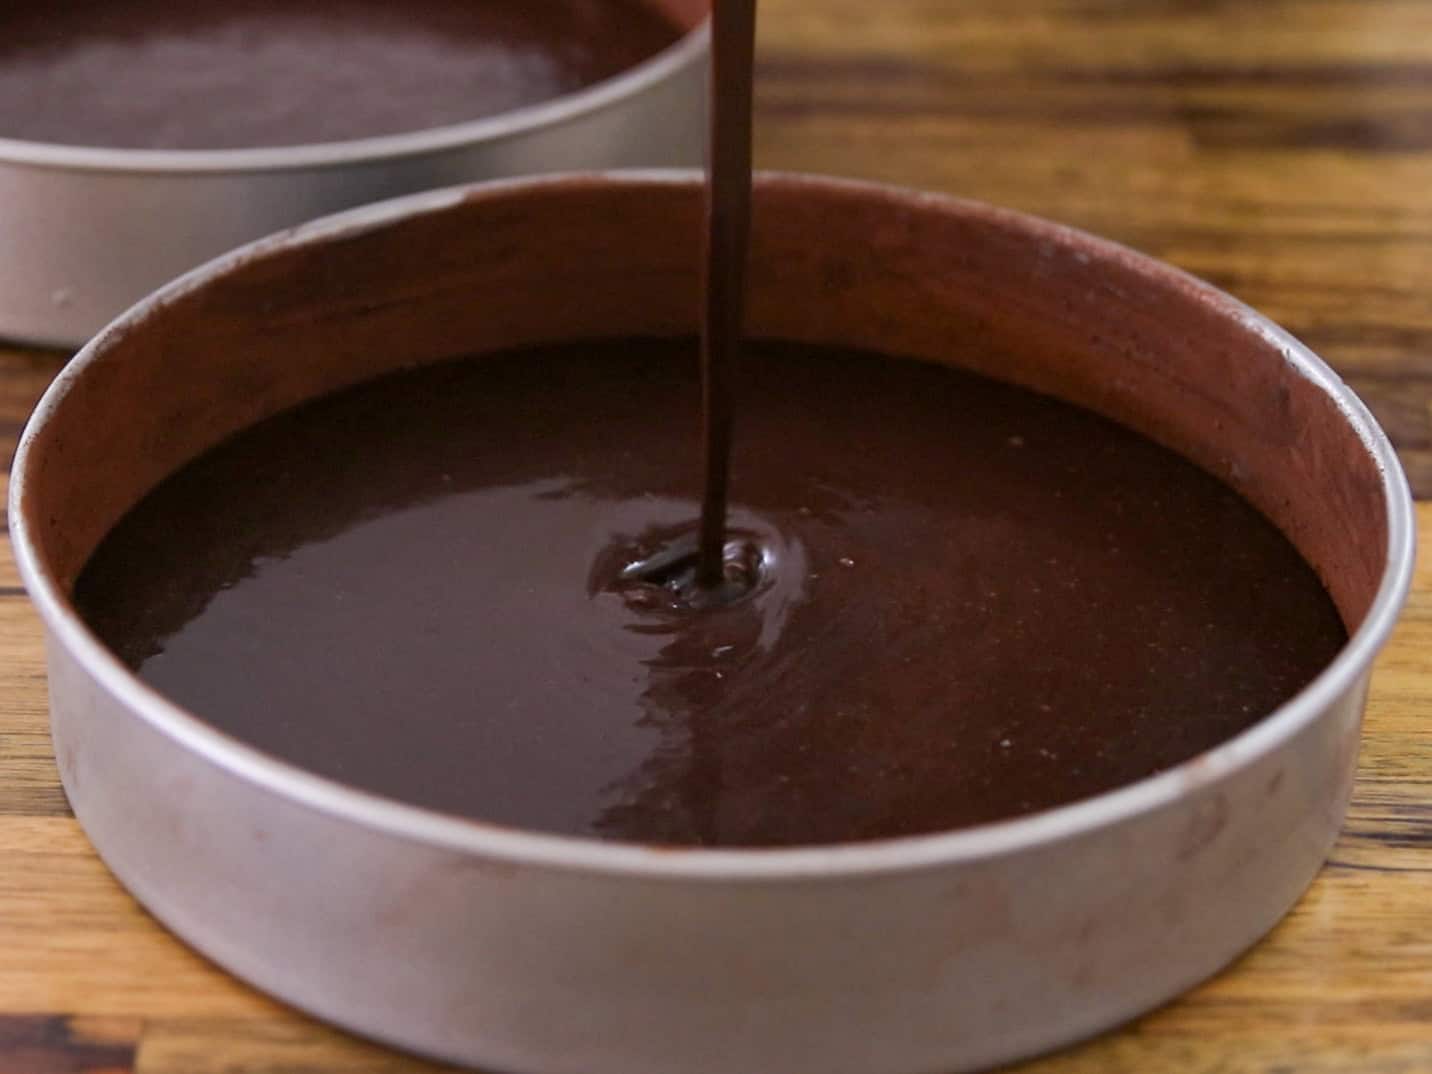
Chocolate cake batter
Expert Tips & Tricks
Use hot coffee for maximum chocolate flavor. The heat helps bloom the cocoa powder, deepening the cake’s chocolate notes.
Mix the batter gently—it’s supposed to be thin. Chocolate cakes made with oil and buttermilk have a naturally runny batter. This is what keeps the cake incredibly moist. Resist the urge to add extra flour; just whisk until combined.
Stir your natural peanut butter very well. Oil separation is normal. If you don’t mix it thoroughly before measuring, the frosting can turn greasy, runny, or uneven in texture. Stir from the bottom of the jar!
Whip the frosting until fluffy, not stiff. Peanut butter frosting can thicken quickly. Beat it just until smooth and airy. Add a tablespoon of cream at a time if it needs loosening.
Chill the cakes before assembling. Because the frosting is soft and creamy, stacking and frosting the cake is much easier when the cake layers are cold. Pop them in the fridge or freezer for 20-30 minutes before assembly.
Make the ganache last and let it cool slightly. Ganache thickens as it cools. Let it sit for 10-15 minutes until it’s pourable but not hot, then spoon it over the frosted cake for the perfect drip effect.
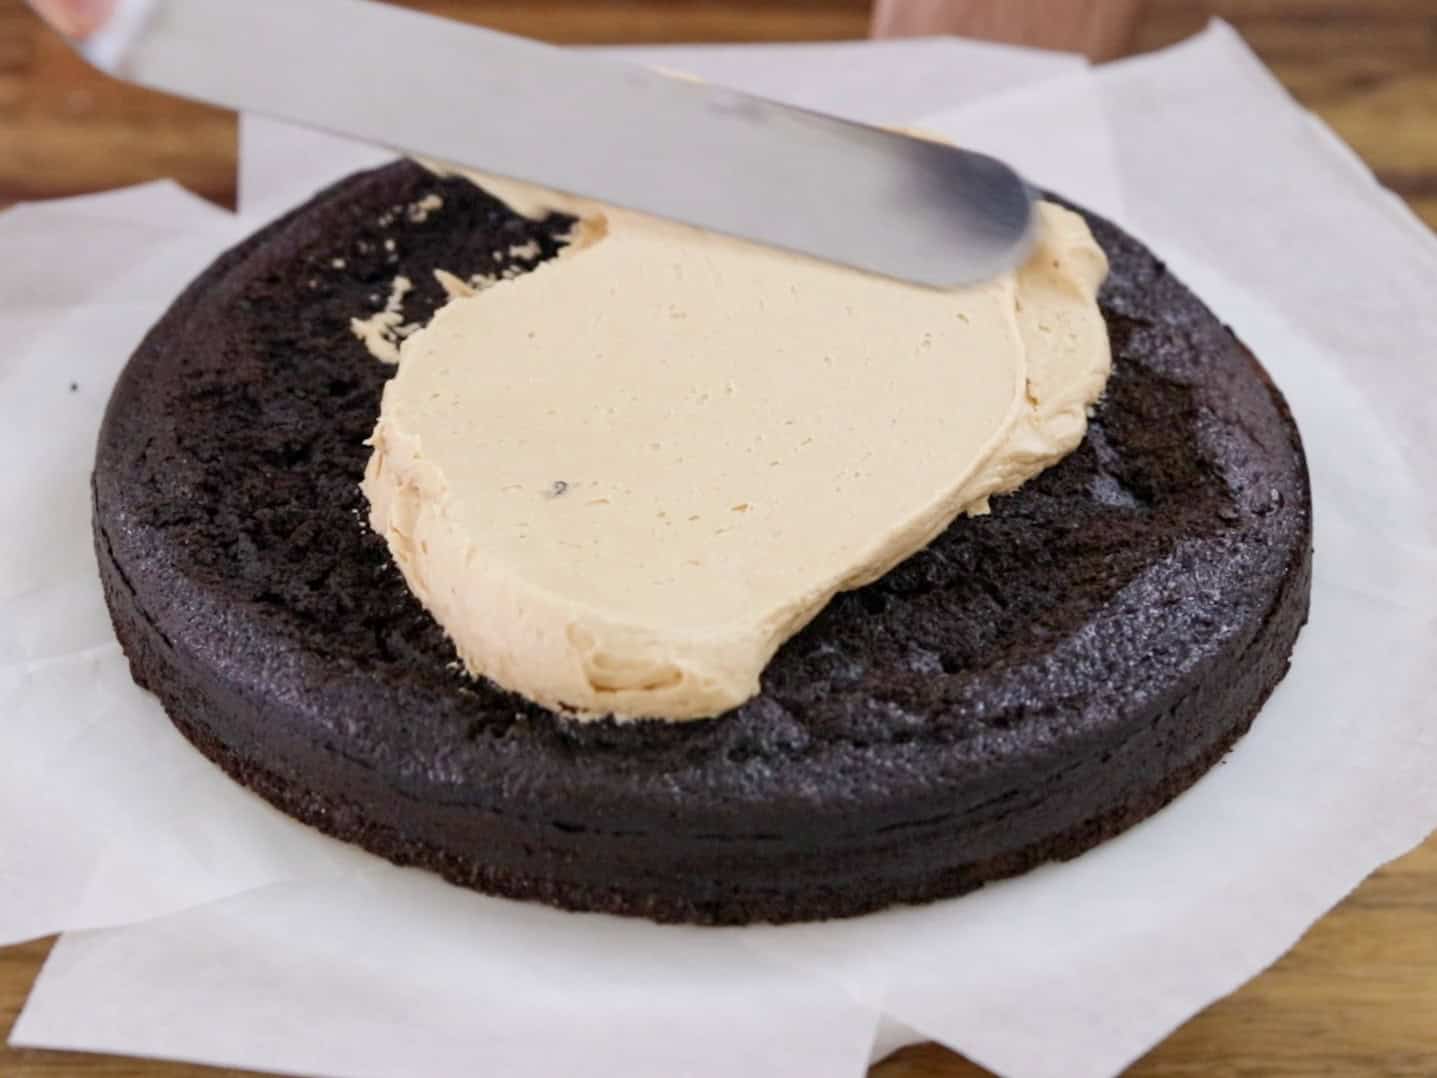
Use an offset spatula for clean layers. Peanut butter frosting is thicker than regular buttercream, so using an offset spatula helps you spread it evenly without tearing the cake.
Peanut butter frosting
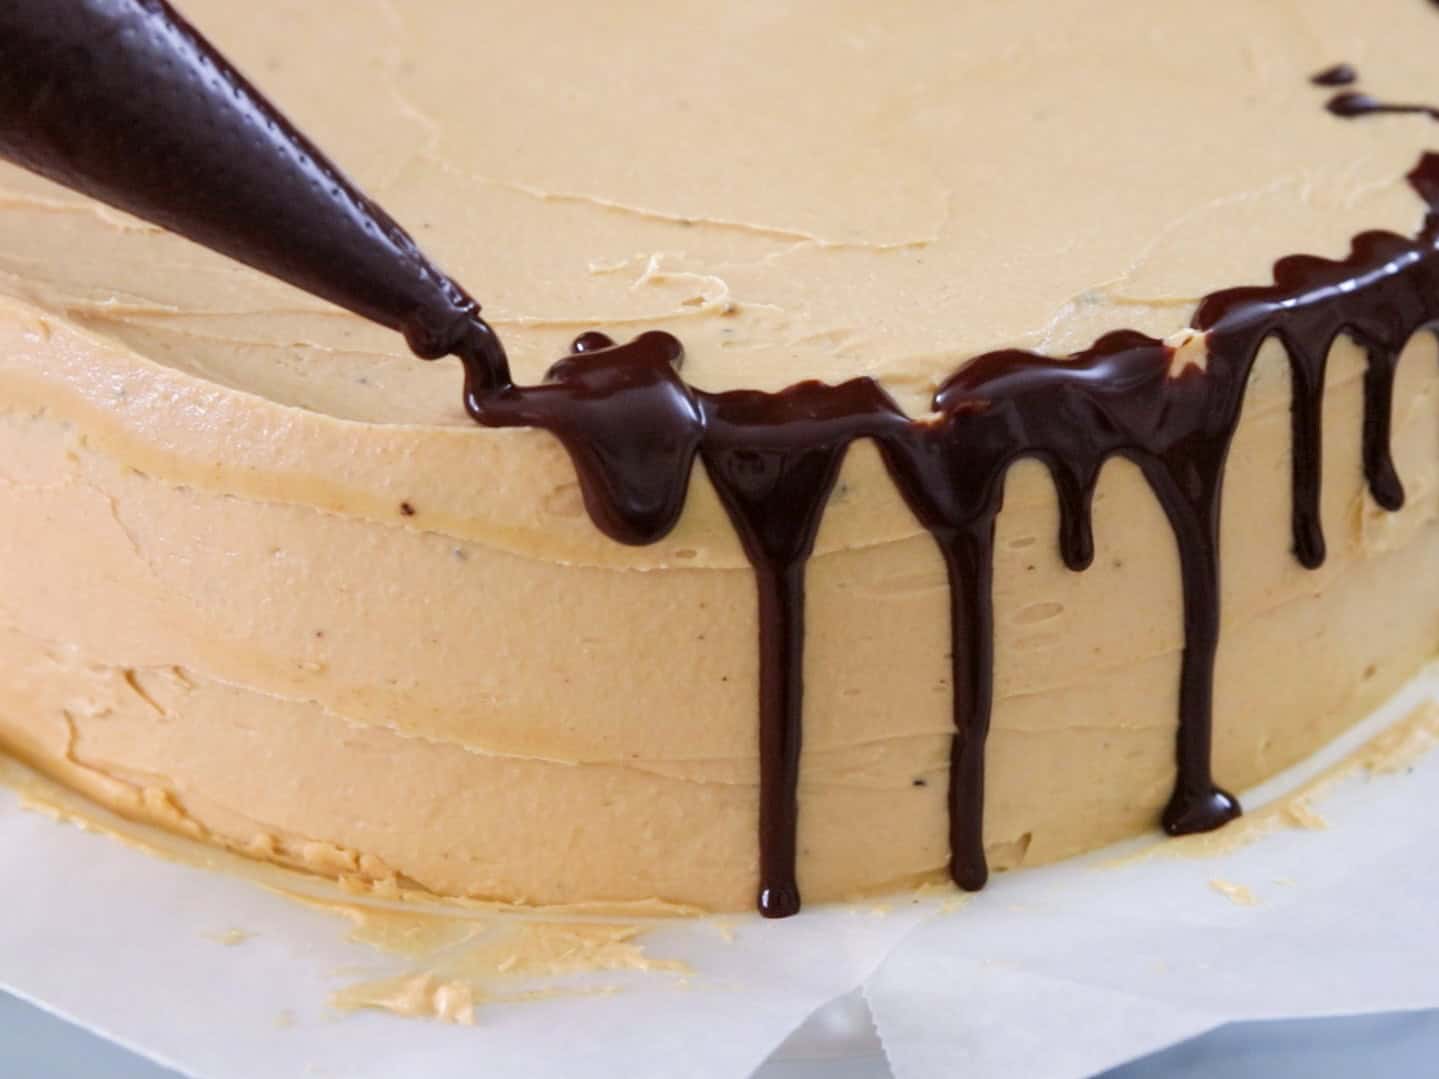
Last step: chocolate ganache
How to Serve
This chocolate peanut butter cake shines on its own, but a few simple touches make it extra special. Serve it slightly chilled for clean slices, then let each piece sit at room temperature for 10–15 minutes so the frosting softens and the flavors fully bloom.
Cake and ice cream are a natural pair, especially for birthday celebrations. Serve it with a scoop of salted caramel ice cream, peanut butter ice cream, or chocolate ice cream (or small scoops of all three!). Chopped roasted peanuts or mini peanut butter cups add a fun crunch.
If you’d like something a bit lighter, fresh berries like raspberries or strawberries provide a bright, acidic counterpoint to the richness.
How to Store Chocolate Peanut Butter Cake
Refrigerator: Store the assembled cake in an airtight container in the refrigerator for 4-5 days. The cream in the frosting and ganache means it must be kept chilled, but for the best texture, let each slice sit at room temperature for about 20 minutes before serving so the frosting softens and the flavors come through beautifully.
Freezer: Chocolate peanut butter cake can also be frozen: place it in the fridge until the frosting and ganache are firm, then wrap the entire cake (or individual slices) tightly in plastic wrap and a layer of foil. Freeze for up to 1 month, and thaw in the refrigerator before serving.
Make-Ahead Tip: If you’re storing the cake layers before assembly, wrap them tightly in plastic wrap and keep them at room temperature for 1 day or refrigerate for up to 4 days. The cake layers freeze exceptionally well, wrap each cooled layer in plastic wrap, then foil, and freeze for up to 3 months. Thaw overnight in the fridge, then frost.
Prepare the pans and oven: Preheat oven to 350°F (180°C). Butter two 8-inch (20 cm) round cake pans, line bottoms with parchment, grease sides, and dust lightly with cocoa powder.
Mix dry ingredients: In a large bowl, whisk flour, cocoa powder, sugar, baking powder, baking soda, and salt.
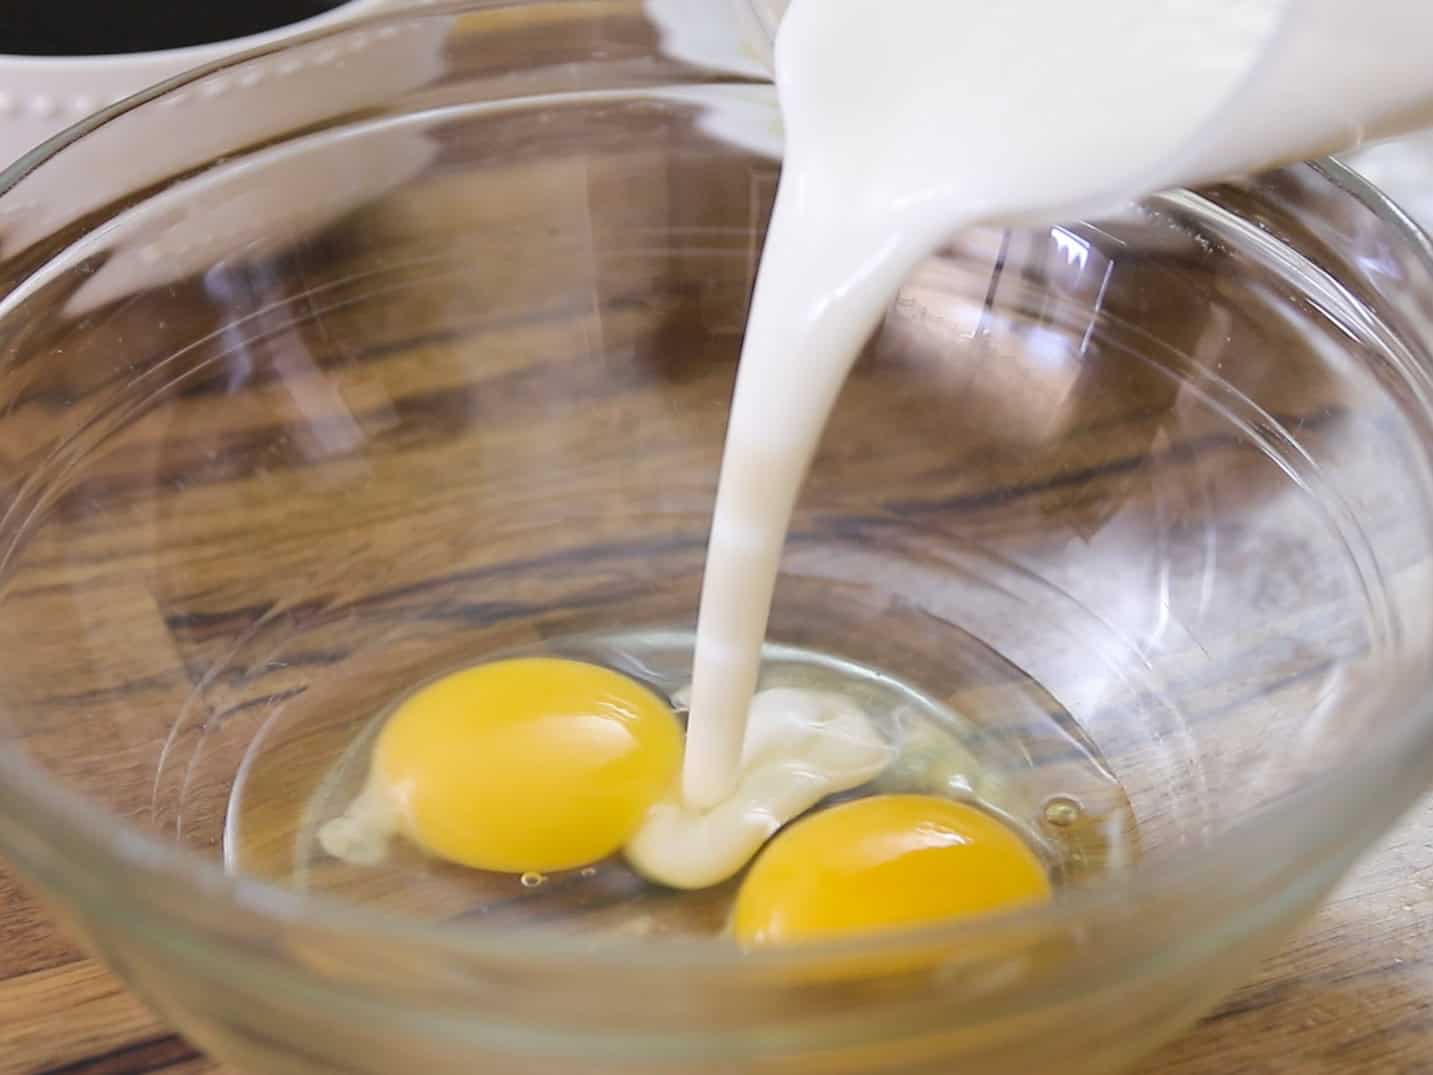
Mix wet ingredients: In another bowl, whisk eggs, buttermilk, oil, and vanilla.
Mix: Add wet ingredients to dry and mix until just combined. Pour in hot coffee and whisk until smooth (batter will be thin).
Bake and cool: Divide batter evenly between pans. Bake 30–35 minutes, until a toothpick inserted comes out clean. Cool completely, then level the cake layers if needed.
Make the Peanut Butter Frosting:
Beat butter and peanut butter until light and fluffy.
Add powdered sugar and beat on low speed until combined.
Gradually add heavy cream, 2 tablespoons at a time, plus vanilla. Beat until smooth, fluffy, and spreadable.
Assemble:
Place one cake layer flat-side down. Spread an even layer of frosting on top.
Add second cake layer, flat-side up. Frost top and sides.
Transfer remaining frosting to a piping bag and refrigerate the cake 2–3 hours to set.
Make the Ganache
Place chopped chocolate in a bowl. Heat cream until just simmering, then pour over chocolate. Let sit 1–2 minutes, then stir until smooth.
Finish:
Pour ganache over chilled cake, letting it drip naturally. Smooth the top if needed.
Pipe reserved peanut butter frosting on top.
Let set before slicing.
Video
Notes
Coffee:You’ll probably not taste the coffee at all, it simply enhances and deepens the chocolate flavor (even in cakes for kids). I don’t recommend skipping it. However, if you really insist, you can swap it for hot water. The texture will be similar, but the chocolate flavor won’t be quite as rich.
Peanut Butter: Natural peanut butter works best. If very oily, stir well before using.
Don’t skip buttermilk: Don’t skip the buttermilk. Its acidity reacts with the baking soda to create a softer crumb and helps keep the cake extra moist. If needed, you can make a substitute by mixing 1 cup milk with 1 tablespoon lemon juice or vinegar and letting it sit for 5 minutes.
Make Ahead: Cake layers can be baked 1 day ahead and wrapped tightly.
Storage: Store covered in the fridge for up to 4 days.
Freezing: Cake layers freeze well (up to 2 months). Frosting and ganache are best made fresh.
Is natural or no-stir peanut butter better for peanut butter frosting?
I think natural peanut butter provides better texture and richer peanut flavor.
Should I use creamy or chunky peanut butter?
I’d recommend using creamy peanut butter for a smooth frosting, then adding texture with chopped nuts if you desire.
Can I use regular milk instead of buttermilk?
You can, but the texture won’t be quite as moist or tender. For best results, make a quick substitute by mixing 1 cup milk with 1 tablespoon lemon juice or vinegar and letting it sit for 5 minutes.
Why is hot coffee used in chocolate cake batter?
Hot coffee enhances the chocolate flavor by blooming the cocoa powder. You won’t taste the coffee in the finished cake, it simply makes the chocolate taste deeper and richer.
I made this cake for our holiday gathering this year (2025). While it did not look as professional as the pictured cake, I was pleased with how it looked and everyone thought it was beautiful. Even better, it was a spectacular hit. In fact, my children think I should try to sell it, even suggesting pricing between $30 and $50! I will not be attempting to sell this cake, of course! The cake was moist, tender and had a great chocolate flavor. I personally like the peanut butter frosting. It was easy to spread and pipe rosettes with (important for not-the-best decorator). Better yet, it was just peanut buttery enough and not overly sweet like so many frostings. The ganache was a wonderful finishing touch. I have gluten intolerant family members so I did use a measure-for-measure gluten-free flour. I have found that the texture of baked goods using gluten-free flour is usually slightly different. The crumb tended to stick to the knife, but rinsing the knife with hot water and wiping it in-between slices solved this “issue”. The video and directions are easy to follow, by the way, and I really like that you do not need high-end appliances to make all of David’s recipes. Thank you, sir, for a wonderful recipe!! My family has requested that I make this again and I will.
Hi Barbara,
Thank you so much for this wonderful and thoughtful review! I’m really happy to hear the cake was such a hit with your family, and I love that your kids thought it was “sell-worthy”.
Great tip about using a gluten-free measure-for-measure flour, that will definitely help other bakers.
Thank you again for taking the time to share your experience and for trusting my recipe for your holiday gathering, it truly means a lot. I’m honored your family asked you to make it again! 🙏
I would’ve loved to have seen how you did the ganache your video ended. I think the video was too long in the beginning showing too much stirring. I think it could’ve been cut to see the whole video how you frosted the cake and the pouring of the ganaching . your cake looks absolutely beautiful. I can’t wait to make it
Haven’t made this cake yet as I have a couple of questions:
1) Only 2 people in our family like coffee, I also would like to offer it to my little granddaughter, is there a substitute for coffee?
2) I don’t like the American way of using oil, particularly vegetable oil which is suspect in what the ingredients are. I would use butter as in English baking, is this feasible for this recipe and do you have a guide as to how much I should use?
Genuinely interested in baking this cake as it looks lovely, so any help would be appreciated. Thank you.
Hi Chris,
1. You won’t taste coffee in the finished cake, it’s there purely to enhance the chocolate flavor, not to make it taste like coffee. Even kids usually can’t tell.
That said, if you prefer to skip it (especially for your granddaughter), you can safely replace the coffee with hot water as mentioned in the recipe.
2. Yes, it’s absolutely feasible to use butter.
What to know first:
*Oil gives the cake a very moist, soft crumb that stays moist longer
*Butter adds flavor, but the cake will be slightly firmer
Replace ½ cup (120 ml) vegetable oil with ¾ cup (170 g) melted unsalted butter.
Outstanding cake! I’m making it for the second time now.
The cake throws off a lot of crumbs. So this time, I did a quick crumb coat and put it back in the refrigerator for a half hour. I ended up with a much neater layer of frosting. I could smooth it without pulling up crumbs. Also, the ganache needed a little more chocolate – it was too fluid and I had to wait to smooth the top until it had cooled down from the cold cake.
This was literally so fun to make and the taste was amazing! When I first served it, people thought that I’d bought at a bakery! It was so beautiful, tasty and made me look like a professional baker!! Thank you for the recipe!!!


")
")
")

")


can’t wait to try it! thank you so much for sharing your recipes, the detail and follow when people ask questions. Your generosity is appreciated.
Thank you so much for your kind words. I really appreciate it! Hope you enjoy the recipe, and feel free to let me know how it turns out
I made this cake for our holiday gathering this year (2025). While it did not look as professional as the pictured cake, I was pleased with how it looked and everyone thought it was beautiful. Even better, it was a spectacular hit. In fact, my children think I should try to sell it, even suggesting pricing between $30 and $50! I will not be attempting to sell this cake, of course! The cake was moist, tender and had a great chocolate flavor. I personally like the peanut butter frosting. It was easy to spread and pipe rosettes with (important for not-the-best decorator). Better yet, it was just peanut buttery enough and not overly sweet like so many frostings. The ganache was a wonderful finishing touch. I have gluten intolerant family members so I did use a measure-for-measure gluten-free flour. I have found that the texture of baked goods using gluten-free flour is usually slightly different. The crumb tended to stick to the knife, but rinsing the knife with hot water and wiping it in-between slices solved this “issue”. The video and directions are easy to follow, by the way, and I really like that you do not need high-end appliances to make all of David’s recipes. Thank you, sir, for a wonderful recipe!! My family has requested that I make this again and I will.
Hi Barbara,
Thank you so much for this wonderful and thoughtful review! I’m really happy to hear the cake was such a hit with your family, and I love that your kids thought it was “sell-worthy”.
Great tip about using a gluten-free measure-for-measure flour, that will definitely help other bakers.
Thank you again for taking the time to share your experience and for trusting my recipe for your holiday gathering, it truly means a lot. I’m honored your family asked you to make it again! 🙏
I would’ve loved to have seen how you did the ganache your video ended. I think the video was too long in the beginning showing too much stirring. I think it could’ve been cut to see the whole video how you frosted the cake and the pouring of the ganaching . your cake looks absolutely beautiful. I can’t wait to make it
Haven’t made this cake yet as I have a couple of questions:
1) Only 2 people in our family like coffee, I also would like to offer it to my little granddaughter, is there a substitute for coffee?
2) I don’t like the American way of using oil, particularly vegetable oil which is suspect in what the ingredients are. I would use butter as in English baking, is this feasible for this recipe and do you have a guide as to how much I should use?
Genuinely interested in baking this cake as it looks lovely, so any help would be appreciated. Thank you.
Hi Chris,
1. You won’t taste coffee in the finished cake, it’s there purely to enhance the chocolate flavor, not to make it taste like coffee. Even kids usually can’t tell.
That said, if you prefer to skip it (especially for your granddaughter), you can safely replace the coffee with hot water as mentioned in the recipe.
2. Yes, it’s absolutely feasible to use butter.
What to know first:
*Oil gives the cake a very moist, soft crumb that stays moist longer
*Butter adds flavor, but the cake will be slightly firmer
Replace ½ cup (120 ml) vegetable oil with ¾ cup (170 g) melted unsalted butter.
Outstanding cake! I’m making it for the second time now.
The cake throws off a lot of crumbs. So this time, I did a quick crumb coat and put it back in the refrigerator for a half hour. I ended up with a much neater layer of frosting. I could smooth it without pulling up crumbs. Also, the ganache needed a little more chocolate – it was too fluid and I had to wait to smooth the top until it had cooled down from the cold cake.
This was literally so fun to make and the taste was amazing! When I first served it, people thought that I’d bought at a bakery! It was so beautiful, tasty and made me look like a professional baker!! Thank you for the recipe!!!
Can I make cupcakes with this recipe? Would you recommend doubling? Thanks!
love your recipes! please continue to send them to me!
Looks delicious, I can’t wait to make it for my sis in laws restaurant…love your videos!